
Ever wish your shower felt more like a spa, or perhaps you’re looking for a more accessible option in your bathroom? Whether for relaxation, safety, or accessibility, installing a remodel shower seat is a great upgrade for your home in Birmingham. But, the big question is: how do I install a remodel shower seat on a tile wall? Tile can be tricky, and the last thing you want is a cracked tile or an unstable seat.
This guide will walk you through the installation process step by step, giving you the confidence to complete the project yourself—or know exactly what to ask a local professional to do.
What is a Remodel Shower Seat, and Why Install One?
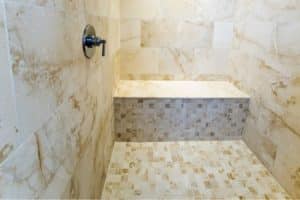
A remodel shower seat is a bench or fold-down seat designed to be installed after your shower is tiled. Unlike built-in benches, these seats are mounted to the wall and are built to support weight.
Why people in Birmingham install shower seats:
- Improved safety for seniors or individuals with mobility issues
- Convenience for shaving, foot care, or relaxation
- Adds value to your home with a universal design
- Provides a spa-like experience in your everyday bathroom
Not all shower seats are the same. Choosing the right one depends on your bathroom’s layout, your personal needs, and your aesthetic preferences. Here are some options to consider for your home in Birmingham:
Types of Shower Seats
Fold-Down Seats
Ideal for smaller showers or multi-user spaces, these seats can be folded up when not in use, saving space while still providing support when needed.
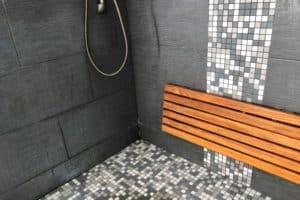
Fixed Wall-Mounted Benches
These permanent benches provide a wider seating area and offer a more built-in, sleek look. They’re perfect for larger showers or if you prefer a more stationary option.
Material Options:
Teak or Wood-Look
Stylish and spa-like but requires regular maintenance to prevent water damage.
Plastic or Polyurethane
Lightweight, affordable, and easy to clean.
Stainless Steel or Aluminum
Durable, often used for ADA-compliant seats.
Tools & Materials You’ll Need
Tools:
- Stud finder
- Level
- Drill and tile drill bit
- Screwdriver or impact driver
- Tape measure
- Pencil or washable marker
Materials:
- Wall-mounted shower seat
- Mounting bracket (usually included with the seat)
- Screws and anchors (wall-specific)
- Silicone sealant (optional for waterproofing)
Step-by-Step Guide: How do I Install a Remodel Shower Seat on a Tile Wall
Step 1: Choose the Best Location
Select a spot that allows comfortable use. The standard height is 17–19 inches from the shower floor. Ensure it’s near fixtures like the showerhead or grab bars if needed. Use a stud finder to locate wall studs for the most secure installation.
Pro Tip: If there’s no stud in your chosen location, use toggle bolts or heavy-duty anchors, but check the weight capacity first.
Step 2: Mark Drill Points
Hold the bracket or seat against the wall and use a level to ensure it’s straight. Mark the screw holes with a pencil.
Step 3: Drill Through Tile Safely
Use a carbide-tipped or diamond-tipped drill bit to avoid damaging the tile. Apply steady, gentle pressure. Once through the tile, switch to a regular drill bit to go deeper into the wall/stud. Use painter’s tape on your drill mark to prevent slipping.
Step 4: Drill Through Tile Safely
If you’re not drilling into a stud, use toggle bolts or heavy-duty wall anchors to secure the seat. Make sure they can hold at least 250–300 lbs or more.
Step 5: Mount the Bracket and Attach the Seat
Secure the mounting bracket using the provided screws. Once the bracket is aligned and tight, attach the shower seat per the manufacturer’s instructions. For most fold-down or fixed models, the seat either clips into the bracket or screws directly into place. Test the seat by applying light pressure to ensure it’s secure before full use.
Step 6: Waterproof with Silicone Sealant (Optional)
For extra moisture protection, apply silicone sealant around the edges of the bracket or screws to prevent water from seeping behind the mount. This is especially important if your grout is worn or in areas with frequent water exposure.
Incorporate Safety and Accessibility Standards
When installing a shower seat for safety and accessibility, it’s important to follow the ADA guidelines to ensure it meets the needs of individuals with limited mobility, which benefits not only those with disabilities but also anyone with reduced mobility or aging in place.
Important ADA Guidelines for Shower Seats:
- Height: The seat should be installed at a height that accommodates users with disabilities, generally between 17 to 19 inches from the floor.
- Weight Capacity: Make sure your shower seat can support the weight of the person who will be using it. ADA-compliant seats should support at least 250 lbs or more.
- Placement: If the seat is fold-down, ensure it can be folded up without requiring too much effort, and the area around the seat should be clear for easy access.
- Grab Bars: For added safety, consider installing grab bars near the seat for additional stability. These are important for individuals who need extra support when standing up or sitting down.
Common Mistakes to Avoid When Installing on Tile
Skipping the stud finder
Don’t assume tile alone will hold the weight. Always locate at least one stud for a secure installation.
Using the wrong drill bit
Tile requires a specialty carbide or diamond-tipped drill bit. Regular drill bits can crack the tile.
Over-tightening screws
Tighten screws just enough to secure the bracket. Over-tightening can crack your tiles.
Ignoring weight ratings
Always check that your hardware is rated to handle the necessary weight.
Consider Professional Installation
While many are confident in their DIY abilities, some situations are better handled by a professional. If you’re dealing with older tiles, irregularly spaced studs, or lack comfort with power tools, a professional’s expertise can ensure a secure and efficient installation.
When to hire a professional:
- If you’re unsure about finding studs or need custom positioning for your shower seat.
- If the tile is old or delicate, drilling is difficult.
- If you lack the necessary tools or experience for a precise, secure installation.
- If you’re installing a more complex, built-in shower seat that requires additional plumbing work.
Conclusion
Installing a remodel shower seat on a tile wall in your home can make your bathroom safer and more comfortable. With the right tools and a few careful steps—like finding wall studs and using the correct drill bit—you can create a secure and long-lasting installation. Whether you choose to install the seat yourself or hire a local professional, this upgrade adds comfort and value to your home.
By following the steps and avoiding common mistakes, you can complete the project without damaging your tile or creating unnecessary extra work. Get started today, and enjoy the benefits of a spa-like shower experience every day!
